> ## Documentation Index
> Fetch the complete documentation index at: https://docs.myperch.io/llms.txt
> Use this file to discover all available pages before exploring further.
# Postman Setup Guide
> Step-by-step guide to import and configure the Perch API in Postman for instant testing
## Overview
By simply importing one of our API Spec documents into Postman, you can start using the Perch API near-instantly. Follow the guide below to download and import an OpenAPI Spec into Postman.
## Requirements
Before getting started, ensure you have:
* The [Postman application](https://www.postman.com/downloads/)
* An OpenAPI Spec from Perch
* An API Key from Perch
## Download API Specs
Choose the appropriate API specification for your use case:
* **Partner API Spec** - Available in the Partner API documentation
* **Realtor API Spec** - Available in the Realtor API documentation (if applicable)
Please contact us at [partnersupport@myperch.io](mailto:partnersupport@myperch.io) should you have any challenges or questions obtaining any of the above.
## Setup Instructions
### Step A: Import the API Spec
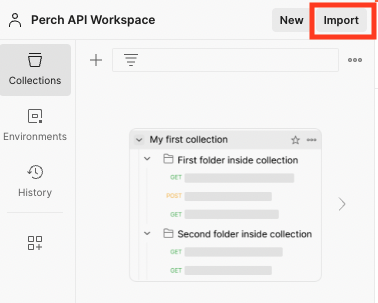
1. Click **Import** in Postman.
 ### Step B: Configure Import Settings
1. Select **OpenAPI 3.1 with a Postman Collection**
2. Click into **View Import Settings** before doing the import
### Step B: Configure Import Settings
1. Select **OpenAPI 3.1 with a Postman Collection**
2. Click into **View Import Settings** before doing the import
 ### Step C: Set Import Preferences
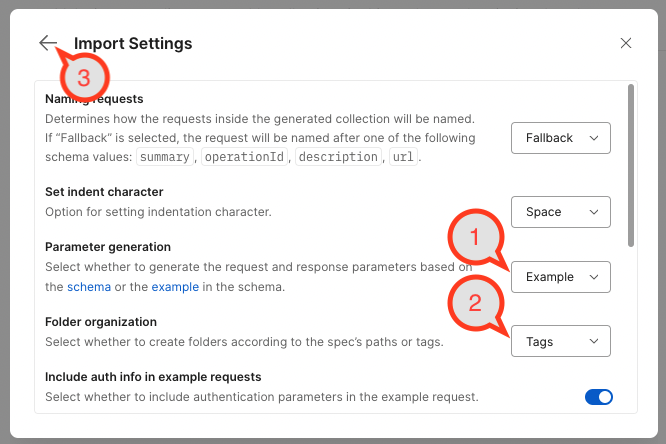
Configure the import settings as follows:
1. Set **Parameter generation** to **Example**
2. Set **Folder organization** to **Tags**
3. Click the back arrow to return to the previous screen and click **Import**
### Step C: Set Import Preferences
Configure the import settings as follows:
1. Set **Parameter generation** to **Example**
2. Set **Folder organization** to **Tags**
3. Click the back arrow to return to the previous screen and click **Import**
 ### Step D: Verify Import Success
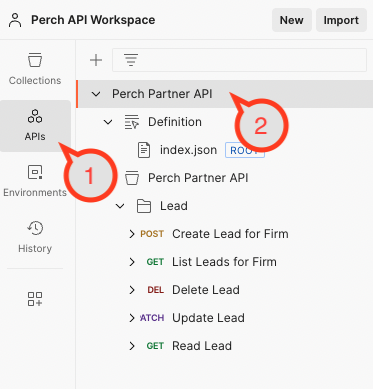
Once imported, you will be able to see the imported Definition and Collection:
1. Open the **APIs** section
2. Expand the sections to view the **Definition** and the **Perch Partner API Collection**
### Step D: Verify Import Success
Once imported, you will be able to see the imported Definition and Collection:
1. Open the **APIs** section
2. Expand the sections to view the **Definition** and the **Perch Partner API Collection**
 ### Step E: Configure API Authentication
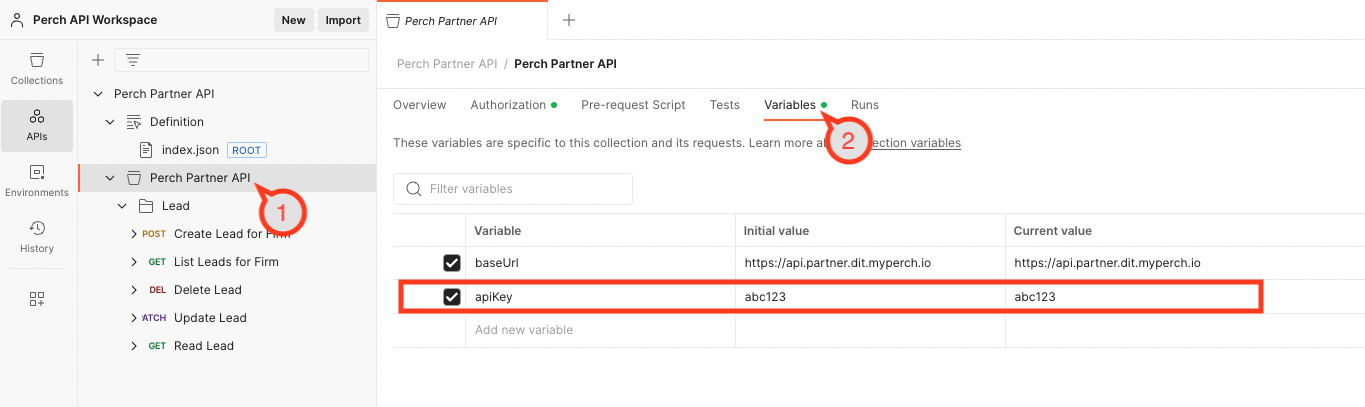
Set up your API key using the provided credentials:
1. Open the **Perch Partner API Collection**
2. Open the **Variables** section and add the **`apiKey`** variable. This will apply the API key to all the requests in the collection.
### Step E: Configure API Authentication
Set up your API key using the provided credentials:
1. Open the **Perch Partner API Collection**
2. Open the **Variables** section and add the **`apiKey`** variable. This will apply the API key to all the requests in the collection.
 Remember to keep your API key secure and never expose it in client-side applications or public repositories.
### Step F: Explore Data Schemas
To view the data schema for resources like a *Lead*:
1. View **`index.json`** under the **Definition**
2. In the **Components > schemas** section, you will find schema definitions (e.g., *Lead* schema). This outlines all the data fields and their acceptable values.
Remember to keep your API key secure and never expose it in client-side applications or public repositories.
### Step F: Explore Data Schemas
To view the data schema for resources like a *Lead*:
1. View **`index.json`** under the **Definition**
2. In the **Components > schemas** section, you will find schema definitions (e.g., *Lead* schema). This outlines all the data fields and their acceptable values.
 ### Step G: Test API Requests
To make sample HTTP requests:
1. Open the **Perch Partner API > Lead** section (or your desired endpoint)
2. Choose a request in the collection
3. View the **Body** of the request if applicable (e.g., **`POST/PATCH`** requests)
4. To set parameters like **`:id`** in the URL path, open the **Params** section
5. Click **Send** to make a request to the API based on the **`baseUrl`** in the Variables section
### Step G: Test API Requests
To make sample HTTP requests:
1. Open the **Perch Partner API > Lead** section (or your desired endpoint)
2. Choose a request in the collection
3. View the **Body** of the request if applicable (e.g., **`POST/PATCH`** requests)
4. To set parameters like **`:id`** in the URL path, open the **Params** section
5. Click **Send** to make a request to the API based on the **`baseUrl`** in the Variables section
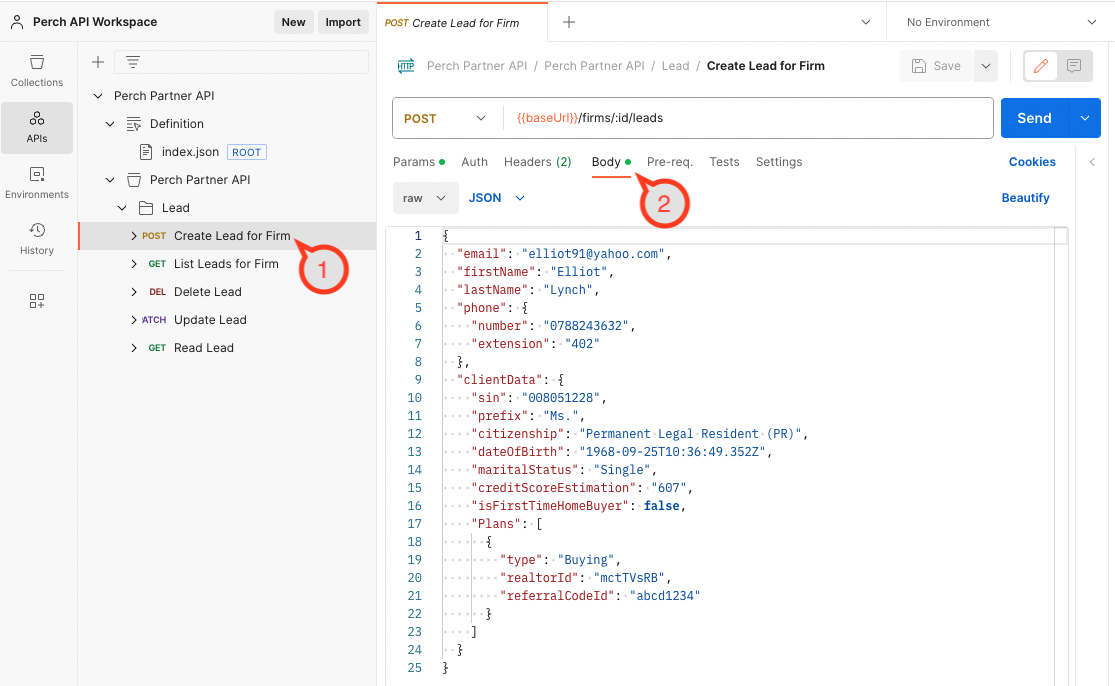 By default, requests will be made to the test environment. You can modify the `baseUrl` variable to switch between test and production environments.
## Next Steps
Now that you have Postman configured with the Perch API:
* Explore the various endpoints available in your collection
* Review the [Overview](/getting-started/overview) for authentication and usage details
* Test different requests in the sandbox environment before moving to production
* Refer to the full API documentation for detailed endpoint specifications
By default, requests will be made to the test environment. You can modify the `baseUrl` variable to switch between test and production environments.
## Next Steps
Now that you have Postman configured with the Perch API:
* Explore the various endpoints available in your collection
* Review the [Overview](/getting-started/overview) for authentication and usage details
* Test different requests in the sandbox environment before moving to production
* Refer to the full API documentation for detailed endpoint specifications